Introduction
This guide walks you through the process of deploying Ansible Automation Platform (AAP) on an OpenShift cluster. First, it covers installing the AAP Operator, followed by creating an Automation Controller. Next, you’ll learn how to configure persistent storage to ensure data is retained properly. After that, the guide explains how to access the AAP web interface and navigate its features. Furthermore, it provides a detailed, step-by-step process for setting up an inventory, configuring credentials, and creating a project. Finally, you’ll see how to run an automation job to update hosts. By following these steps, you will gain a clear understanding of how to successfully install Ansible Automation Platform on OpenShift.
Let’s get started!
Deploy AAP
Step 1.1 – Accessing Operator hub
- Log in to the OpenShift cluster web console as an Administrator.
- Navigate to Operator Hub under Operators.
- Search for Ansible Automation Platform (AAP) and install the operator.
Step 1.2: Create the Automation Controller
1. Once the installation is complete, go to Operators > Installed Operators > Ansible Automation Platform.
2. Select your Automation Controller, then click Create AutomationController.
3. Now enter the desired name and click Create.
Step 1.3: Configure Persistent Storage
Now we will manually create a PersistentVolume (PV) and StorageClass by applying these configuration files:
$ cat pv.yaml
apiVersion: v1
kind: PersistentVolume
metadata:
  name: postgres-local-pv
spec:
  capacity:
    storage: 13Gi
  accessModes:
    - ReadWriteOnce
  persistentVolumeReclaimPolicy: Retain
  storageClassName: hostpath-storage
  local:
    path: /mnt/data  # Make sure this dir exists on the node
  nodeAffinity:
    required:
      nodeSelectorTerms:
        - matchExpressions:
            - key: kubernetes.io/hostname
              operator: In
              values:
                - < node-name >
$ cat storageclass.yaml
apiVersion: storage.k8s.io/v1
kind: StorageClass
metadata:
  name: hostpath-storage
  annotations:
    storageclass.kubernetes.io/is-default-class: "true"
provisioner: kubernetes.io/no-provisioner
volumeBindingMode: WaitForFirstConsumer
$ oc apply -f pv.yaml
persistentvolume/postgres-local-pv created
$ oc apply -f storageclass.yaml
storageclass.storage.k8s.io/hostpath-storage created
Step 1.4: Monitor the Deployment
Please watch as the automation takes place, and make sure the pods are up and running. However, there might be pods that are not functioning correctly. You may delete them if needed.
$ watch oc get pods
NAME                                                              READY   STATUS    RESTARTS        AGE
automation-controller-operator-controller-manager-57d865fbfdk2w   2/2     Running   0               1m
automation-hub-operator-controller-manager-59455bd75f-7lwnp	  2/2     Running   0               1m
eda-server-operator-controller-manager-69885b9544-7l976           2/2     Running   0               1m
example-postgres-13-0                                             1/1     Running   0               1m
example-task-65c68fb5d7-f5n56                                     4/4     Running   1 (1m ago)   1m
example-web-6d7c669479-29kjd                                      3/3     Running   0               1m
resource-operator-controller-manager-669bb7fd87-89dsj             2/2     Running   0               1m
Step 1.5: Access the AAP Web Interface
- Once the installation is complete, locate the AAP web GUI URL under Networking > Routes > Location.
- Open the URL in a new browser tab.
Step 1.6: Log in to AAP for the First Time
- Now we Retrieve the admin password from the OpenShift console:
- Navigate to Workloads > Secrets.
- Find the admin-password secret.
- Copy the password.
2. Log in to the web interface using admin as the username and the copied password.
3. Follow the on-screen login instructions until you reach the Dashboard.
Job to Update Hosts
Now let’s create a small demo that will update a host.
Step 2.1 – Create an Inventory
1. Navigate to Resources > Inventories > Add > Add inventory.
2. Pick a name, select an organization and press Save.
3. Navigate to Hosts, and click Add.
4. Now add FQDN or IP of the hosts you would like to update, click Save.
Step 2.2 – Set Up Credentials
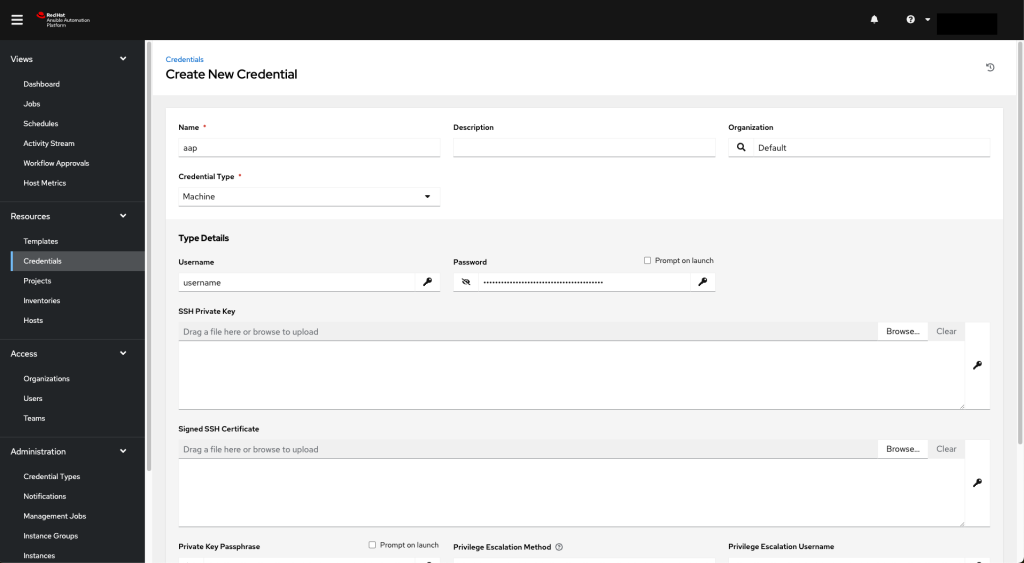
1. To begin, navigate to Credentials under the Resources section. Once there, go ahead and click on Add to create a new credential.
2. Next, add your credentials for connecting to your host. Then, scroll down to review your settings, and finally, press Save to confirm and store the credentials.

Step 2.3 – Create a Project
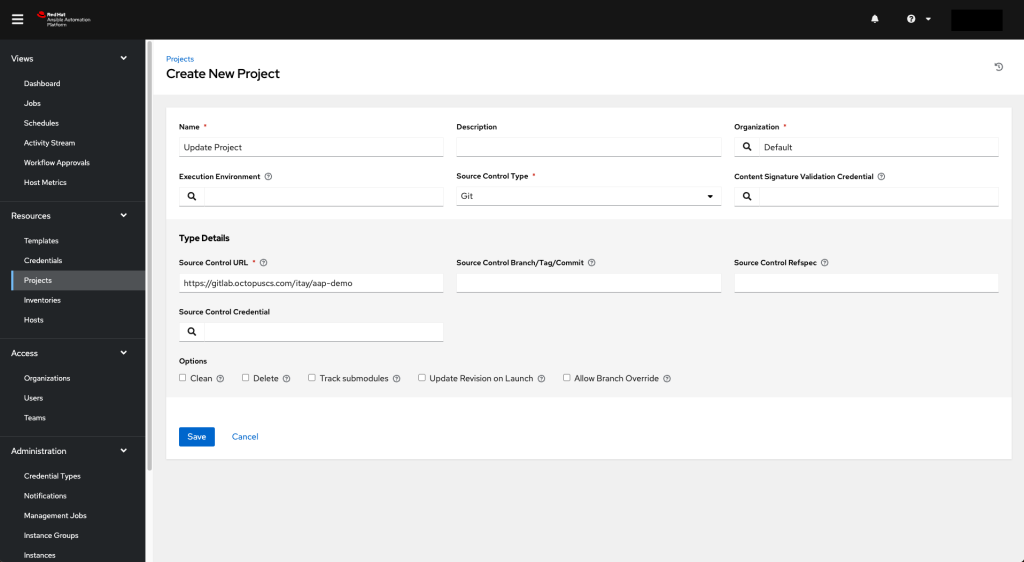
1. First, navigate to Resources and then select Projects. Once you’re there, click on Add to create a new project.
2. Give the project a name and add the url of your git repository, and press Save.

Step 2.4 – Create a Job template
1. Navigate to Resources > Templates, and click Add > Add job template.
2. Name the template, select Run as the job type, and fill the correct Inventory, Project, Playbook and Credentials. Scroll down and click Save.
Step 2.5 – Run the Job
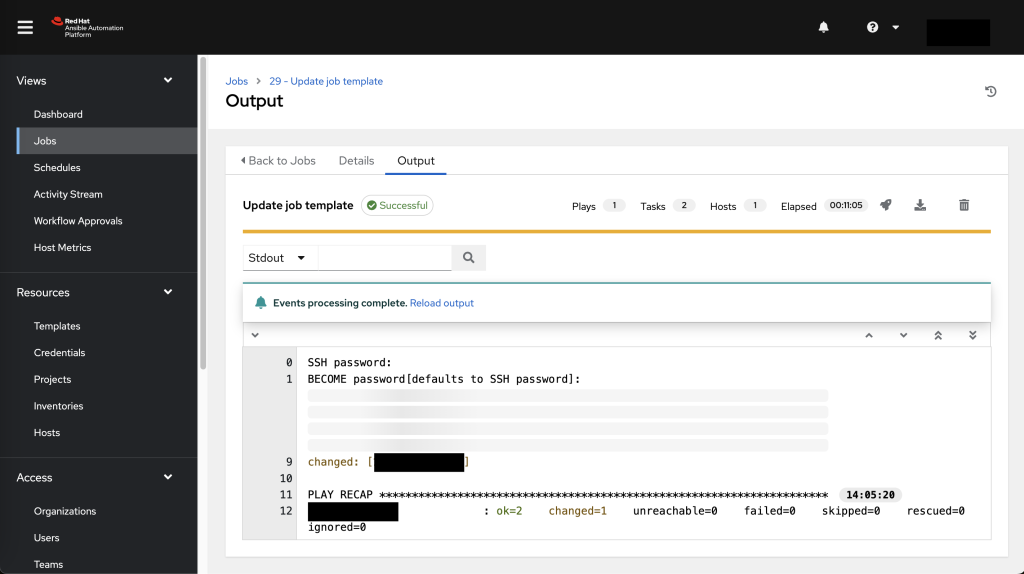
1. Navigate to Templates, and click the rocket icon (🚀) under your job template.
2. Watch as the magic happens:

3. SSH into the node to verify the node has been updated
$ ssh username@<ip of your node>
$ sudo dnf update
Dependencies resolved.
Nothing to do.
Complete!
Summary
In this article, we learned how to install and configure Ansible Automation Platform (AAP) on OpenShift cluster. We went through the process of installing the AAP Operator, creating an Automation Controller, and setting up persistent storage. We then explored how to access the AAP web interface, retrieve credentials, and log in for the first time. Finally, we created an inventory, configured credentials, set up a project, and ran an automation job to update hosts. With AAP successfully deployed, you are now ready to automate tasks and manage IT operations efficiently.
If you would like to learn how to deploy applications in k8s follow How to use Ansible to Deploy Application in K8S?
For deploying an SNO I would recommend to follow: How to deploy Single Node OpenShift (SNO) 4.10


