
Introduction
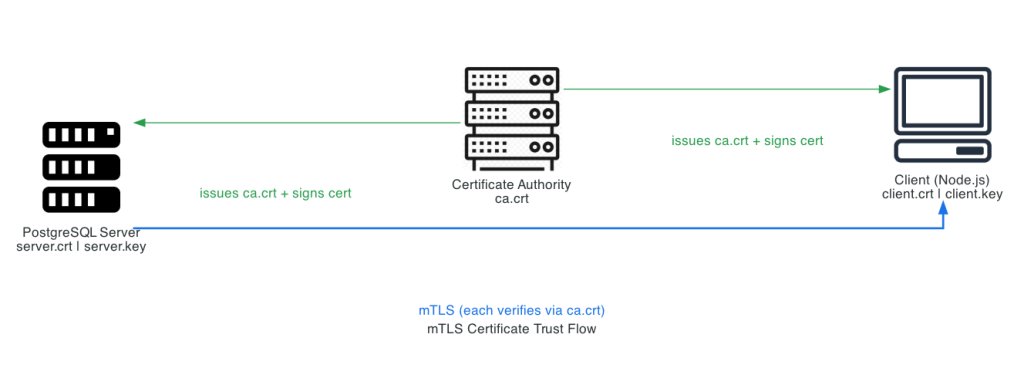
Mutual TLS (mTLS) lets 2 services prove their identity to each other using X.509 certificates, so no password is passes through the network. In a standard TLS setup, only the server presents a certificate and the client stays anonymous, usually authenticating with a password. With mTLS, the client also presents a certificate, and PostgreSQL maps that certificate to a database role.
This is important in security-strict environments, for example defense and finance, where a stolen password must not cause a data breach. The tools we are going to demonstrate it with OpenSSL, PostgreSQL and Node.js. Node.js will serve as the client, but the configuration steps are identical for any choice of client.
By the end, you will have a working, password-free, mutually authenticated connection that you can reproduce in your own deployment.
We will use our own self-signed Certificate Authority.
Prerequisites
- A RHEL 9 host with root or sudo access. The examples place PostgreSQL and the Node.js client on the same node.
- PostgreSQL database. Any recent PostgreSQL 14 or later works.
- Node.js 18 or later.
- OpenSSL, which is part of a base RHEL 9 install.
Procedure
Step 1: Install PostgreSQL, Node.js, and OpenSSL
Install the necessary tools and initialize PostgreSQL:
$ dnf install -y postgresql-server postgresql nodejs openssl
$ postgresql-setup --initdb
$ systemctl enable --now postgresql
Confirm PostgreSQL is up:
$ systemctl status postgresql --no-pager
Active: active (running)
The PostgreSQL data and config files directory on RHEL 9 is /var/lib/pgsql/data.
Step 2: Create a private certificate authority
Generate a self-signed CA certificate files
$ mkdir -p ~/mtls-demo/certs && cd ~/mtls-demo/certs
$ openssl genrsa -out ca.key 4096
$ openssl req -x509 -new -nodes -key ca.key -sha256 -days 3650 \
  -subj "/CN=mtls-demo-ca" -out ca.crt
Important: Never share the private key of the CA.
Step 3: Issue the server certificate
The server certificate must carry a Subject Alternative Name (SAN) that matches the hostname of the PostgreSQL server. Generate and sign your cert files using the CA’s.
$ openssl genrsa -out server.key 2048
$ openssl req -new -key server.key \
  -subj "/CN=postgres.rhel.co.il" -out server.csr

$ cat > server.ext <<'EOF'
subjectAltName = DNS:postgres.rhel.co.il,DNS:localhost,IP:127.0.0.1
extendedKeyUsage = serverAuth
EOF

$ openssl x509 -req -in server.csr -CA ca.crt -CAkey ca.key \
  -CAcreateserial -out server.crt -days 825 -sha256 -extfile server.ext
The SAN list should include every name and address the client will call. Adding localhost and 127.0.0.1 makes local testing work without a separate certificate.
Step 4: Issue the client certificate
Set the CN of the certificate as same as the username/role in the PostgreSQL server.
$ openssl genrsa -out client.key 2048
$ openssl req -new -key client.key \
  -subj "/CN=octopus-rhel" -out client.csr

$ cat > client.ext <<'EOF'
extendedKeyUsage = clientAuth
EOF
$ openssl x509 -req -in client.csr -CA ca.crt -CAkey ca.key \
  -CAcreateserial -out client.crt -days 825 -sha256 -extfile client.ext
Verify all certs are valid againts the CA.
$ openssl verify -CAfile ca.crt server.crt
server.crt: OK
$ openssl verify -CAfile ca.crt client.crt
client.crt: OK
Step 5: Copy the CA, server crt and key to the data dir and set permissions
Copy the files into the PostgreSQL data directory, set the owner and permissions, then restore the SELinux context.
$ mkdir -p /home/user/mtls-demo/certs
$ chown user:user {client.crt,client.key}
$ cp {ca.crt,client.crt,client.key} /home/user/mtls-demo/certs/
$ chown postgres:postgres {ca.crt,server.crt,server.key}
$ chmod 644 {ca.crt,server.crt}
$ chmod 600 server.key
$ cp {ca.crt,server.crt,server.key} /var/lib/pgsql/data && cd /var/lib/pgsql/data

$ restorecon -v /var/lib/pgsql/data/ca.crt /var/lib/pgsql/data/server.crt /var/lib/pgsql/data/server.key

$ ls -lZ /var/lib/pgsql/data/ | grep -iE 'server.|ca.crt'
-rw-r--r--. 1 postgres postgres unconfined_u:object_r:postgresql_db_t:s0   1814 Jun 16 16:33 ca.crt
-rw-r--r--. 1 postgres postgres unconfined_u:object_r:postgresql_db_t:s0   1521 Jun 16 16:33 server.crt
-rw-------. 1 postgres postgres unconfined_u:object_r:postgresql_db_t:s0   1704 Jun 16 16:33 server.key
Enable TLS in PostgreSQL and restart for the changes to take effect.
$ vim /var/lib/pgsql/data/postgresql.conf
...
# - SSL -

ssl = on
ssl_cert_file = 'server.crt'
ssl_key_file = 'server.key'
ssl_ca_file = 'ca.crt'
...

$ systemctl restart postgresql
$ systemctl status postgresql
● postgresql.service - PostgreSQL database server
     Loaded: loaded (/usr/lib/systemd/system/postgresql.service; enabled; preset: disabled)
     Active: active (running) since Tue 2026-06-16 16:56:17 IDT; 2min 18s ago
...
Step 6: Create the database role and require client certificates
Create a role on PostgreSQL with the same username as the one in the client’s certificate CN.
$ sudo -u postgres psql -c 'CREATE ROLE "octopus-rhel" LOGIN;'
CREATE ROLE

$ sudo -u postgres psql -c 'GRANT CONNECT ON DATABASE postgres TO "octopus-rhel";'
GRANT
Add the cert rule to /var/lib/pgsql/data/pg_hba.conf above any looser rules for the same address:
$ vim pg_hba.conf
...
# TYPE   DATABASE   USER            ADDRESS         METHOD
hostssl  all        "octopus-rhel"  0.0.0.0/0       cert clientcert=verify-ca
hostssl  all        all             0.0.0.0/0       reject
The clientcert option controls how PostgreSQL validates the client certificate at the SSL layer:
- no-verify (default): The client may present a certificate, but PostgreSQL does not check it.
- verify-ca: The certificate must be signed by a trusted CA (
ssl_ca_file). Use this for internal deployments where you control the CA. - verify-full: Also checks that the certificate’s CN or SAN matches the client’s IP or hostname. Use this when clients connect over a public or untrusted network.
Reload the configuration:
$ sudo -u postgres psql -c "SELECT pg_reload_conf();"
 pg_reload_conf
----------------
 t
(1 row)
Allow PostgreSQL ports in firewall.
$ firewall-cmd --add-service=postgresql --permanent
$ firewall-cmd --reload
Testing The Connection
Test the mTLS connection with a Node.js client
We will write a Node.js application that acts as a client.
$ mkdir -p ~/mtls-demo/node-client/src && cd ~/mtls-demo/node-client
$ npm init -y
Wrote to /home/user/mtls-demo/node-client/package.json:

{
  "name": "client",
  "version": "1.0.0",
  "description": "",
  "main": "index.js",
  "scripts": {
    "test": "echo \"Error: no test specified\" && exit 1"
  },
  "keywords": [],
  "author": "",
  "license": "ISC"
}

$ npm install pg dotenv
added 15 packages, and audited 16 packages in 3s
In this demonstration we use a local hidden .env file to keep the database connection details out of the source code. You can use other solutions for that, like a key vault store. For production, prefer a secrets manager or a mounted secrets volume.
Create the .env file with the following settings.
$ vim .env
PGHOST=localhost
PGPORT=5432
PGDATABASE=postgres
PGUSER=octopus-rhel
PGSSL_CA=/home/user/mtls-demo/certs/ca.crt
PGSSL_CERT=/home/user/mtls-demo/certs/client.crt
PGSSL_KEY=/home/user/mtls-demo/certs/client.key
PGSSL_REJECT_UNAUTHORIZED=true
Create the following test application:
$ vim src/connect.js
const fs = require("fs");
const path = require("path");
const { Client } = require("pg");
require("dotenv").config();

const REQUIRED_ENV_KEYS = [
  "PGHOST", "PGPORT", "PGDATABASE", "PGUSER",
  "PGSSL_CA", "PGSSL_CERT", "PGSSL_KEY",
];

function readFileOrThrow(environment_key) {
  const file_path = process.env[environment_key];
  if (!file_path) {
    throw new Error(`Missing environment variable: ${environment_key}`);
  }
  const resolved_path = path.resolve(file_path);
  if (!fs.existsSync(resolved_path)) {
    throw new Error(`TLS file not found (${environment_key}): ${resolved_path}`);
  }
  return fs.readFileSync(resolved_path);
}

function buildPostgresClient() {
  for (const key of REQUIRED_ENV_KEYS) {
    if (!process.env[key]) {
      throw new Error(`Missing environment variable: ${key}`);
    }
  }
  const reject_unauthorized = process.env.PGSSL_REJECT_UNAUTHORIZED !== "false";
  return new Client({
    host: process.env.PGHOST,
    port: Number(process.env.PGPORT),
    database: process.env.PGDATABASE,
    user: process.env.PGUSER,
    ssl: {
      ca: readFileOrThrow("PGSSL_CA"),
      cert: readFileOrThrow("PGSSL_CERT"),
      key: readFileOrThrow("PGSSL_KEY"),
      rejectUnauthorized: reject_unauthorized,
    },
  });
}

async function main() {
  const client = buildPostgresClient();
  await client.connect();
  const result = await client.query(
    "SELECT current_user, ssl AS tls_active FROM pg_stat_ssl WHERE pid = pg_backend_pid()"
  );
  console.log("Connected:", result.rows[0]);
  await client.end();
}

main().catch((error) => {
  console.error("Connection failed:", error.message);
  process.exit(1);
});
Verify the mTLS connection
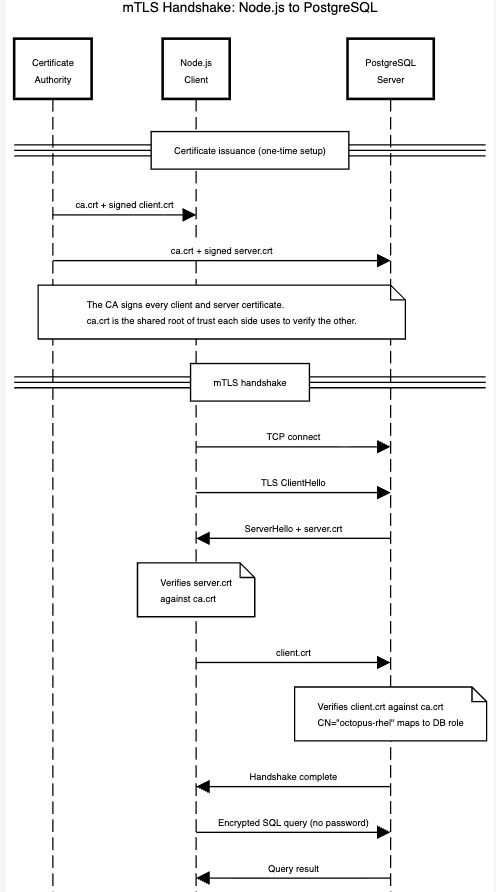
The diagram above shows the full mTLS handshake. Both sides exchange certificates, verify them against the shared CA, and the server maps the client’s CN to a database role before allowing any query.
Test the client:
$ node src/connect.js
Connected: { current_user: 'octopus-rhel', tls_active: true }
This confirms PostgreSQL authenticated the role from the certificate, and tls_active set to true confirms the session is encrypted. In addition, you can inspect the handshake and the server certificate directly with OpenSSL:
$ openssl s_client -connect localhost:5432 -starttls postgres \
  -CAfile /home/user/mtls-demo/certs/ca.crt </dev/null
Connecting to ::1
CONNECTED(00000003)
...
---
SSL handshake has read 3173 bytes and written 761 bytes
Verification: OK
---
New, TLSv1.3, Cipher is TLS_AES_256_GCM_SHA384
Protocol: TLSv1.3
Server public key is 2048 bit
This TLS version forbids renegotiation.
Compression: NONE
Expansion: NONE
No ALPN negotiated
Early data was not sent
Verify return code: 0 (ok)
---
DONE
Troubleshooting common errors
- Peer authentication failed for user “postgres”: you ran
psql -U postgresas root. Usesudo -u postgres psqlso the OS user matches the role for peer auth. - certificate verify failed: the client does not trust the server certificate, or the host name does not match the SAN. Confirm the client uses the same
ca.crtand that the SAN includes the value ofPGHOST. - connection requires a valid client certificate: the client presented no certificate. Confirm the
ssl.certandssl.keypaths in the Node.js client resolve to real files. - certificate authentication failed for user “octopus-rhel”: the certificate Common Name does not match the role, or the role does not exist. The CN must equal the PostgreSQL role name exactly.
- password authentication failed: a looser rule in
pg_hba.confmatched first. Place thehostsslcert rule for"octopus-rhel"above any rule for the same address. - private key file has group or world access: the server key permissions are too open. Set
server.keyto mode 0600 owned by postgres. - permission denied reading server.key under SELinux: the file context is wrong after copying. Run
restoreconon the certificate files in the data directory, as shown in Step 5.
Summary
In this guide we showed you how to configure mTLS between PostgreSQL and a Node.js client on RHEL 9, from a private certificate authority through to a verified, password-free connection confirmed with both Node.js and OpenSSL.
The result is a connection where identity is proven on both sides and no password travels the network, which is what air-gapped environments require. The same PostgreSQL configuration works for any client language; only the SSL object in the driver changes. At Octopus Computer Solutions we design and harden Red Hat platforms for organizations where certificate-based identity is a baseline requirement rather than an afterthought.
To take this further, see our guide on deploying SSO with FreeIPA and Keycloak on RHEL 9 for identity at the application layer, the PostgreSQL SSL documentation, and the Red Hat Enterprise Linux 9 securing networks guide.